U12 Fundamental Ball Control & Serving

U12
Total Duration 60 min (60 min target)
Total Drills 4 Activities
Created Date Aug 25, 2026
Practice Focus & Goals:

Designed for young players to master the basics: solid passing platform, consistent overhand serving, and fundamental 3-contact rally flow.

Practice Schedule & Phase Breakdown

# Phase Time Drill / Activity Coach Notes & Adaptations
1 Warm-Up 10 m (0–10 m) Volleyball Setting and Overhead Passing Warm-Up Dril Focus on early footwork movement and athletic ready posture.
2 Skill Development 15 m (10–25 m) Over the Net Pepper Drill Passing platform: angle wrists towards target before contact.
3 Skill Development 15 m (25–40 m) Setting Drill - Triangle High toss, firm palm contact on the equator of the volleyball.
4 Scrimmage / Game-Like 20 m (40–60 m) Line Hitting Drill Mini-court Queen of the Court: 3 touches rewarded with bonus points.

Activity Diagrams & Instructions

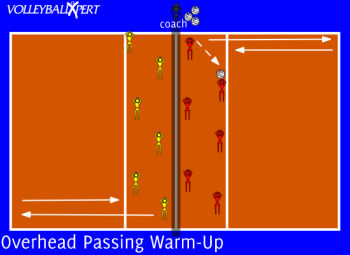
Volleyball Setting and Overhead Passing Warm-Up Dril
Activity Details
Practice Coach Notes:
Focus on early footwork movement and athletic ready posture.

Drill Setup & Court Layout

  • Players: Two teams of 6 players.
  • Court: Full court with a net.
  • Equipment: Supply of volleyballs with the coach positioned at the net to initiate play.
  • Roles: All players are passers/setters; the coach serves as the initiator.

Step-by-Step Instructions

  1. The coach begins each rally by tossing a ball into play, alternating sides.
  2. Players may only use the overhead pass (set) to keep the ball in play.
  3. After completing an overhead pass, the player must sprint to the end line and return before rejoining the play.
  4. Teams score using rally scoring, playing to 10 points.
  5. Players can return the ball on the first, second, or third contact.

Key Coaching Points

  • Movement: Emphasize quick footwork to get behind the ball before setting.
  • Positioning: Feet shoulder-width apart, one slightly forward, knees bent, balanced on the balls of the feet.
  • Hand Shape: Hands up early, fingers spread firm, elbows bent at 45–90 degrees.
  • Technique: Contact the ball at the forehead, using full-body extension (legs and arms) to guide the ball.
  • Control: Use all fingers—ring and pinkie stabilize while thumbs and index provide direction.
  • Follow Through: Extend hands toward the target after release.
  • Communication: Encourage constant calling for the ball and teamwork to find open space.

Activity #2

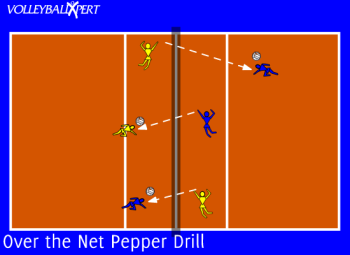
Over the Net Pepper Drill

Skill Development • 15 min
Over the Net Pepper Drill
Activity Details
Practice Coach Notes:
Passing platform: angle wrists towards target before contact.

Drill Setup & Court Layout

  1. Split into groups of 2 with a ball each.
  2. One player on each side of the net.

Step-by-Step Instructions

  1. One player starts with a ball played over the net in a downward flight.
  2. Player two must dig the ball to themselves, set the ball to themselves, then return a ball on a downward flight to the other player.
  3. Continue this pattern until players become comfortable with each of the hits.

Key Coaching Points

Focus on:

  • good digging technique
  • good setting technique
  • good spiking technique

Activity #3

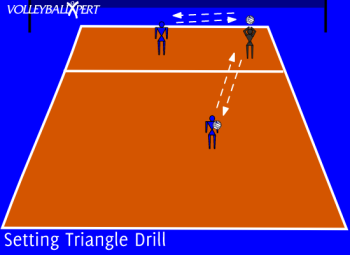
Setting Drill - Triangle

Skill Development • 15 min
Setting Drill - Triangle
Activity Details
Practice Coach Notes:
High toss, firm palm contact on the equator of the volleyball.

Drill Setup & Court Layout

  1. Instruct the setter to bet on the net.
  2. One target player has a ball one the side of the setter.
  3. Another target player starts behind setter with a ball.

Step-by-Step Instructions

  1. One target player tosses the ball to the setter who sets it back to that target player.
  2. Immediately upon returning the first set, the next player tosses the ball to the setter who sets it back to that target player.
  3. Continue with this pattern until the setter is comfortable setting along the net as well as back setting.

Key Coaching Points

Players must be encouraged to use proper technique when setting the ball such as:

  • Moving to the ball before setting
  • Feet shoulder width apart or slightly wider with one foot slightly ahead of the other
  • Knees bent slightly & weight evenly distributed on the balls of feet
  • Hands are cocked in anticipation of the set with your fingers firm and elbows out at a 45 and 90 degree angle.
  • When setting use the fingers using the ring and pinkie to stabilize the ball. The more surface area touched the better control.
  • Take the set around the forehead and use entire body to push it towards the hitter.
  • Follow through with your hands after the ball is released.

Activity #4

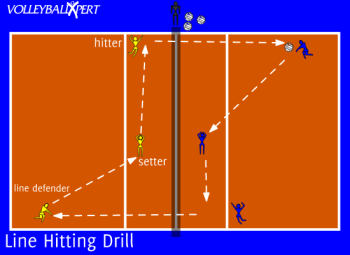
Line Hitting Drill

Scrimmage / Game-Like • 20 min
Line Hitting Drill
Activity Details
Practice Coach Notes:
Mini-court Queen of the Court: 3 touches rewarded with bonus points.

Drill Setup & Court Layout

  1. Set up 3 players on each side of the court. A line defender, a setter, and a hitter.
  2. The line defender should position themselves and defend the line opposite the hitter.
  3. The coach needs a supply of balls near the net.

Step-by-Step Instructions

  1. The coach throws a free ball to the line defender on one side of the court who passes to the setter.
  2. The setter then sets to the hitter along the side line.
  3. The hitter plays a ball down the line towards the line defender.
  4. The play should continue until the ball is dropped.

Key Coaching Points

  • Focus on bump, set, hitting techniques.