All Plans
Shared Volleyball Practice Plan
This practice session was shared with you. You can print the clipboard for court use, or save and customize a copy for your own team.

MS Week 6, Day 1: Pin & Middle Blocker Hand Penetration

U14
Total Duration 75 min (75 min target)
Total Drills 4 Activities
Created Date Aug 26, 2026
Practice Focus & Goals:

Hand shape at the net, pressing over the white tape, and closing the seam between blockers.

Practice Schedule & Phase Breakdown

# Phase Time Drill / Activity Coach Notes & Adaptations
1 Warm-Up 12 m (0–12 m) Volleyball Setting and Overhead Passing Warm-Up Drill Dynamic mobility, agility ladders, and shoulder bands.
2 Skill Development 18 m (12–30 m) Over the Net Pepper Drill: 2-Player Ball Control Warm-Up Technical positional drill isolating today's primary mechanic.
3 Team Systems 20 m (30–50 m) Volleyball Triangle Setting Drill: Front & Back Sets Tactical system drill with controlled coach entries.
4 Scrimmage / Game-Like 25 m (50–75 m) Volleyball Line Hitting Drill: Outside & Right Side Placement Conditioned scrimmage applying session concepts.

Activity Diagrams & Instructions

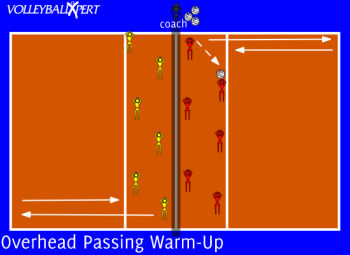
Volleyball Setting and Overhead Passing Warm-Up Drill
Activity Details
Practice Coach Notes:
Dynamic mobility, agility ladders, and shoulder bands.
Key Objective: Improve overhead setting control, quick footwork transition, and communication in a continuous, high-tempo team rally.

Drill Setup & Court Layout

  • Players: 6 vs. 6 (or 4 vs. 4 for more touches).
  • Court: Full court with standard net height.
  • Equipment: Ball cart stationed near coach at the referee stand or sideline at the net.
  • Starting Positions: Standard base defensive positions on both sides.

Step-by-Step Instructions

  1. Initiation: The coach initiates the rally with a free ball toss into one side of the court.
  2. Overhead Only: Players must use clean overhead hand passes (sets) only—no platform digging or attacking.
  3. Sprint Transition: Immediately after setting the ball, that player must sprint to touch their own end line and quickly hustle back into base defensive position.
  4. Team Play: Teammates must communicate and shift to cover the vacated space while their teammate sprints. Teams can return the ball on 1, 2, or 3 contacts.
  5. Scoring: Play continuous rally scoring games to 10 or 15 points. Rotate servers/sides each game.

Key Coaching Points

  • Beat the Ball to the Spot: Sprint and stop with balanced feet before making hand contact—never set on the run if you can avoid it.
  • Early Hand Preparation: Bring hands up high above the forehead before the ball arrives in a relaxed ball-shaped pocket.
  • Full Extension & Push: Generate power through leg extension and finish with thumbs pointing forward and wrists extended toward the target.
  • Space Coverage (Coach Cue): Non-setting players must loudly communicate ("Mine!", "Cover!") and step into open zones while their teammate sprints to the baseline.
  • Safety: Ensure end lines are clear of stray ball carts or water bottles before running the sprint phase.
Activity #2

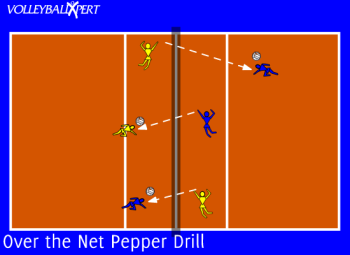
Over the Net Pepper Drill: 2-Player Ball Control Warm-Up

Skill Development • 18 min
Over the Net Pepper Drill: 2-Player Ball Control Warm-Up
Activity Details
Practice Coach Notes:
Technical positional drill isolating today's primary mechanic.
Key Objective: Develop controlled defensive digging, accurate self-setting, and disciplined placement attacking across the net in partner pairs.

Drill Setup & Court Layout

  • Players: Pairs (2 players per group). Multiple pairs can line up along the net.
  • Court: Net divided into 2–3 stations per court.
  • Equipment: 1 volleyball per pair.
  • Positioning: Players stand 8–10 feet off the net directly facing each other across the tape.

Step-by-Step Instructions

  1. Serve/Initiation: Player A initiates with a controlled standing roll shot or down-ball over the net directly at Player B.
  2. Dig & Self-Set: Player B passes (digs) the ball straight up to themselves above head height, then takes a second touch to set the ball to their own hitting approach.
  3. Controlled Attack: On the third touch, Player B jumps or stands to drive a controlled down-ball over the net back to Player A.
  4. Continuous Cycle: Player A executes the same 3-touch sequence (Dig to self → Set to self → Attack over net).
  5. Cooperative Scoring: Challenge pairs to reach 10, 15, or 20 consecutive controlled cycles without a drop.

Key Coaching Points

  • Absorb on the Dig: Use a low platform with a relaxed rebound angle to keep the first contact directly in front of your body rather than over the net.
  • High Self-Set: Set your second ball 6–8 feet high to give yourself adequate time to track footwork and adjust your hitting approach.
  • Controlled Wrist Snap (Attack): Keep your hitting arm high and snap your wrist over the top of the ball for topspin control, aiming directly at your partner's chest.
  • Partner Responsibility: This is a cooperative drill—hit balls your partner can dig, not unreturnable terminal kills.
  • Net Safety: Stay 3 feet off the centerline to prevent under-the-net landing collisions with your partner.

Activity #3

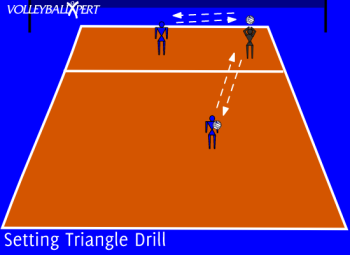
Volleyball Triangle Setting Drill: Front & Back Sets

Team Systems • 20 min
Volleyball Triangle Setting Drill: Front & Back Sets
Activity Details
Practice Coach Notes:
Tactical system drill with controlled coach entries.
Key Objective: Train setters to rapidly square their hips and shoulders to the target antenna while alternating between front sets and back sets under high repetition.

Drill Setup & Court Layout

  • Players: 1 Primary Setter + 2 Passer/Target Players (Groups of 3).
  • Court: Half court at the net.
  • Setup / Positions: Setter positioned at Target Position (Zone 2/3 at the net). Target Player 1 is at Left Front (Position 4). Target Player 2 is at Right Front (Position 2) or Right Back.
  • Equipment: 2 volleyballs (one with each target player).

Step-by-Step Instructions

  1. First Feed (Front Set): Target Player 1 (Position 4) tosses a high pass to the setter at the net. The setter moves, squares to the left antenna, and executes a front set right back to Player 1's hands.
  2. Immediate Second Feed (Back Set): As soon as the setter releases the first set, Target Player 2 (Position 2) tosses a pass to the setter.
  3. Neutral Back Set: The setter adjusts their footwork, maintains a neutral posture, and executes a high back set over their head to Player 2.
  4. Continuous Rhythm: Alternate rapid-fire tosses for 10–15 consecutive repetitions per setter before rotating roles.

Key Coaching Points

  • Right-Left Footwork Finish: Finish every movement with the right foot slightly forward to keep hips from drifting over the net.
  • Square to the Left Antenna: Always square your upper torso and shoulders to the outside hitter's target (Position 4) on both front and back sets to disguise your release.
  • Neutral Back-Setting Posture: Do not arch your back early. Take the ball directly over your forehead and arch slightly through the hips and push with the hands only upon contact.
  • High Ball Pocket: Keep wrists back in a bowl shape; don't drop hands down to chest level between rapid tosses.

Activity #4

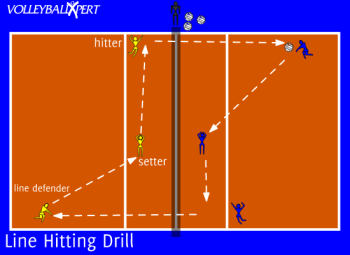
Volleyball Line Hitting Drill: Outside & Right Side Placement

Scrimmage / Game-Like • 25 min
Volleyball Line Hitting Drill: Outside & Right Side Placement
Activity Details
Practice Coach Notes:
Conditioned scrimmage applying session concepts.
Key Objective: Train outside and opposite hitters to attack down the line with control while reinforcing setter rhythm and defensive transition positioning along the sideline.

Drill Setup & Court Layout

  • Players: 3 players per side (Line Defender at Zone 5/1, Target Setter at Zone 2/3, and Outside Hitter at Zone 4).
  • Court: Full court with standard net.
  • Equipment: Ball cart at the net with the coach initiating play.
  • Alignment: The line defender sets up directly opposite the cross-net hitter along the sideline channel.

Step-by-Step Instructions

  1. Initiation: The coach tosses a free ball to the line defender on Side A.
  2. Pass to Setter: The line defender passes high to the target setter at the net.
  3. Line Set: The setter delivers a high-tempo set pushed out toward the antenna along the left sideline.
  4. Controlled Line Attack: The outside hitter approaches and hits a controlled roll shot or down-the-line attack directly at the opposing line defender on Side B.
  5. Continuous Transition: Side B executes the exact same pass-set-hit line sequence back to Side A to maintain a continuous cooperative rally.
  6. Scoring/Rotation: Play to 10 consecutive line rallies, then rotate roles (Defender → Setter → Hitter → Rest/Off-Court).

Key Coaching Points

  • Square Approach Angle: Attackers should maintain an approach angle facing cross-court, turning wrists and shoulders down the line at contact to disguise the shot.
  • Contact at Peak Height: Reach high above the net and contact the top half of the ball with a firm wrist snap to keep the shot inside the sideline tape.
  • Defensive Base on the Line: Line defenders must plant inside the court with shoulders angled inward so dug balls deflect toward the target setter rather than out of bounds.
  • Setter Antenna Spacing: Setters must keep the ball 2–3 feet inside the antenna so the hitter has room to clear the net tape without attacking out.