All Plans
Shared Volleyball Practice Plan
This practice session was shared with you. You can print the clipboard for court use, or save and customize a copy for your own team.

Varsity Week 4, Day 2: Block-Defense Alignment & Rotational Shifts

High School
Total Duration 85 min (90 min target)
Total Drills 4 Activities
Created Date Aug 26, 2026
Practice Focus & Goals:

Defensive back-row positioning inside block shadows and defending tip drops.

Practice Schedule & Phase Breakdown

# Phase Time Drill / Activity Coach Notes & Adaptations
1 Warm-Up 12 m (0–12 m) Volleyball Setting and Overhead Passing Warm-Up Dril Aggressive serving warm-up targeting perimeter seams.
2 Skill Development 20 m (12–32 m) Setting Drill - Triangle Out-of-system emergency setting and pin hitting against a double block.
3 Team Systems 25 m (32–57 m) Line Hitting Drill Wash drill: Serve receive sideout + transition point required to earn 1 big point.
4 Scrimmage / Game-Like 28 m (57–85 m) Cross Court Setting Drill Full 6v6 competitive match simulation starting at 20-20 scoreline.

Activity Diagrams & Instructions

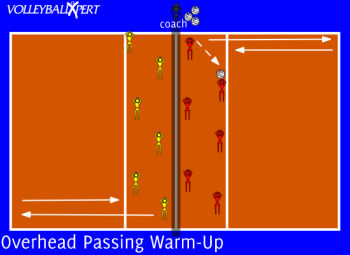
Volleyball Setting and Overhead Passing Warm-Up Dril
Activity Details
Practice Coach Notes:
Aggressive serving warm-up targeting perimeter seams.

Drill Setup & Court Layout

  • Players: Two teams of 6 players.
  • Court: Full court with a net.
  • Equipment: Supply of volleyballs with the coach positioned at the net to initiate play.
  • Roles: All players are passers/setters; the coach serves as the initiator.

Step-by-Step Instructions

  1. The coach begins each rally by tossing a ball into play, alternating sides.
  2. Players may only use the overhead pass (set) to keep the ball in play.
  3. After completing an overhead pass, the player must sprint to the end line and return before rejoining the play.
  4. Teams score using rally scoring, playing to 10 points.
  5. Players can return the ball on the first, second, or third contact.

Key Coaching Points

  • Movement: Emphasize quick footwork to get behind the ball before setting.
  • Positioning: Feet shoulder-width apart, one slightly forward, knees bent, balanced on the balls of the feet.
  • Hand Shape: Hands up early, fingers spread firm, elbows bent at 45–90 degrees.
  • Technique: Contact the ball at the forehead, using full-body extension (legs and arms) to guide the ball.
  • Control: Use all fingers—ring and pinkie stabilize while thumbs and index provide direction.
  • Follow Through: Extend hands toward the target after release.
  • Communication: Encourage constant calling for the ball and teamwork to find open space.

Activity #2

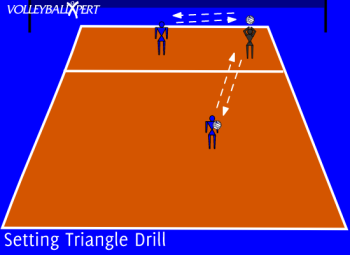
Setting Drill - Triangle

Skill Development • 20 min
Setting Drill - Triangle
Activity Details
Practice Coach Notes:
Out-of-system emergency setting and pin hitting against a double block.

Drill Setup & Court Layout

  1. Instruct the setter to bet on the net.
  2. One target player has a ball one the side of the setter.
  3. Another target player starts behind setter with a ball.

Step-by-Step Instructions

  1. One target player tosses the ball to the setter who sets it back to that target player.
  2. Immediately upon returning the first set, the next player tosses the ball to the setter who sets it back to that target player.
  3. Continue with this pattern until the setter is comfortable setting along the net as well as back setting.

Key Coaching Points

Players must be encouraged to use proper technique when setting the ball such as:

  • Moving to the ball before setting
  • Feet shoulder width apart or slightly wider with one foot slightly ahead of the other
  • Knees bent slightly & weight evenly distributed on the balls of feet
  • Hands are cocked in anticipation of the set with your fingers firm and elbows out at a 45 and 90 degree angle.
  • When setting use the fingers using the ring and pinkie to stabilize the ball. The more surface area touched the better control.
  • Take the set around the forehead and use entire body to push it towards the hitter.
  • Follow through with your hands after the ball is released.

Activity #3

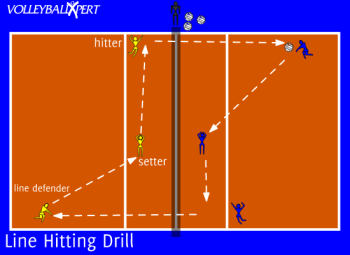
Line Hitting Drill

Team Systems • 25 min
Line Hitting Drill
Activity Details
Practice Coach Notes:
Wash drill: Serve receive sideout + transition point required to earn 1 big point.

Drill Setup & Court Layout

  1. Set up 3 players on each side of the court. A line defender, a setter, and a hitter.
  2. The line defender should position themselves and defend the line opposite the hitter.
  3. The coach needs a supply of balls near the net.

Step-by-Step Instructions

  1. The coach throws a free ball to the line defender on one side of the court who passes to the setter.
  2. The setter then sets to the hitter along the side line.
  3. The hitter plays a ball down the line towards the line defender.
  4. The play should continue until the ball is dropped.

Key Coaching Points

  • Focus on bump, set, hitting techniques. 

Activity #4

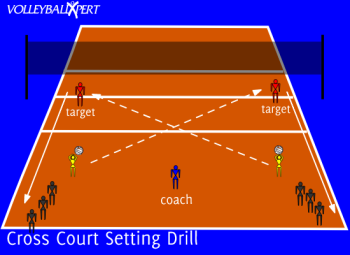
Cross Court Setting Drill

Scrimmage / Game-Like • 28 min
Cross Court Setting Drill
Activity Details
Practice Coach Notes:
Full 6v6 competitive match simulation starting at 20-20 scoreline.

Drill Setup & Court Layout

  1. Position two target players on either side of the court near the net.
  2. Position the remaining players in two lines near the back of the court on either side of the court.
  3. The coach is positioned between the two setters.

Step-by-Step Instructions

  1. The coach begins the drill by throwing or bouncing a ball to one of the setters at the front of the line.
  2. The setting player sets a cross court hittable ball into the target.
  3. The target player moves to the back of the line.
  4. The setter follows their set and becomes the target player.
  5. The coach alternates lines.
  6. Perform the drill until setting a hittable ball becomes comfortable for all players.

Key Coaching Points

Players must be encouraged to use proper technique when setting the ball such as:

  • Moving to the ball before setting
  • Feet shoulder width apart or slightly wider with one foot slightly ahead of the other
  • Knees bent slightly & weight evenly distributed on the balls of feet
  • Hands are cocked in anticipation of the set with your fingers firm and elbows out at a 45 and 90 degree angle.
  • When setting use the fingers using the ring and pinkie to stabilize the ball. The more surface area touched the better control.
  • Take the set around the forehead and use entire body to push it towards the hitter.
  • Follow through with your hands after the ball is released.